Telescopic Boom Lift — Operator Training & Certification
ANSI/SAIA A92.20 & CAN/CSA B354.6 Compliant Training
📋 Section 1: Equipment Overview & Specifications
Introduction
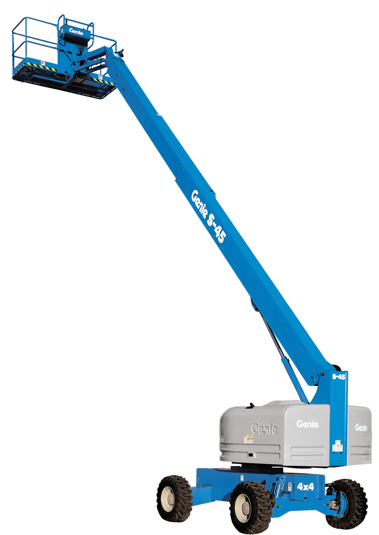
The Genie S-45 XC™ is a diesel-powered telescopic (straight) boom lift in the Xtra Capacity™ (XC) product family. It is designed for heavy construction and industrial work where a single machine must handle both the reach of a boom lift and the payload demands of a work crew with tools and materials. Its dual-capacity rating, CAN-bus diagnostics, and automatic envelope control make it one of the most capable mid-range booms available for low-voltage and general construction work.
⚠️ CRITICAL SAFETY REQUIREMENT: Only trained, authorized, and medically fit personnel may operate Mobile Elevating Work Platforms (MEWPs). Improper use can result in serious injury or death. Failure to follow all safety rules and this training will result in loss of authorization to operate this equipment.
Key Performance Highlights
🔝 Max Working Height
50 ft 6 in (15.56 m) — platform height plus average worker reach
↔️ Max Horizontal Reach
36 ft 2 in (11.02 m) — full horizontal outreach from chassis center
⬇️ Below-Ground Reach
4 ft 2 in (1.27 m) — useful for loading docks and sunken work areas
👷 Dual Capacity
660 lb Unrestricted1,000 lb Restricted
👥 Max Occupants
2 persons (unrestricted) · 3 persons (restricted range of motion)
The XC designation indicates that this machine carries more than the standard payload for a 45-ft boom lift. The key enabling technologies are:
Load Sense Technology: Continuously monitors platform weight in real time. Provides accurate weighing and allows zero-load field calibration without special tools.
Automatic Envelope Control: The boom automatically retracts when it reaches the boundary of its operating envelope, preventing overreach tip-over conditions.
Chassis Tilt Sensor: Detects ground slope conditions and restricts operation accordingly. Enables greater access on uneven terrain while maintaining safety limits.
Restricted Range of Motion (ROM): When platform load exceeds 660 lb, the machine automatically limits the boom's operating envelope to the "restricted" zone, where stability margin allows the higher 1,000 lb rating.
CAN-bus Control System: Controller Area Network provides onboard diagnostics, fault codes, and simplified troubleshooting through the LCD display on the ground control panel.
Typical Applications for Low-Voltage Work
Installing and servicing security cameras at height or over obstructions
Running communications cabling in steel-structure buildings
Installing fire alarm notification appliances on high ceilings
Access control and intrusion detection device installation
Large-venue audio/visual system installation and service
Wireless access point installation on high interior structures
Outdoor conduit, cable tray, and fiber pathway work
🛡️ Section 2: Safety Requirements & Standards
Regulatory Framework
OSHA 1926.453: Aerial lifts — construction industry safety standards
ANSI/SAIA A92.20: Design, calculations, safety requirements and test methods for MEWPs
CAN/CSA B354.6: Canadian standard for self-propelled boom-type elevating work platforms
OSHA 1926.502: Fall protection systems for construction
Operator Requirements — Before You Can Operate
ALL of the following must be satisfied before operating the S-45 XC:
Complete this training program and pass the final assessment (≥ 80%)
Read and understand the Genie S-45 XC Operator's Manual (Part No. 1331850GT)
Receive on-site evaluation and written authorization from your supervisor
Be physically and mentally fit — not impaired by drugs, alcohol, or medications
Understand all site-specific hazards identified in the jobsite safety plan
Required Personal Protective Equipment (PPE)
Hard Hat: ANSI Z89.1 Class E rated
Safety Glasses: ANSI Z87.1 impact-rated
High-Visibility Vest: ANSI/ISEA 107 Class 2 or 3
Steel-Toe Boots: ASTM F2413 rated
Full-Body Harness with Lanyard: Required at all times on the platform — attach lanyard to the designated anchor points inside the platform
Work Gloves: Appropriate for the task being performed
⚠️ FALL PROTECTION IS MANDATORY: Personal fall protection equipment (full-body harness + lanyard) MUST be worn and properly connected to the platform anchor at all times during operation. This is non-negotiable per OSHA and ANSI A92.20 requirements.
Electrical Hazard Clearances
The S-45 XC is NOT electrically insulated. It provides no protection from electrical contact. The following minimum clearances from energized power lines are mandatory. These are absolute minimums — always verify current site requirements.
Line Voltage
Required Clearance (Imperial)
Required Clearance (Metric)
0 to 50 kV
10 ft
3.05 m
50 to 200 kV
15 ft
4.60 m
200 to 350 kV
20 ft
6.10 m
350 to 500 kV
25 ft
7.62 m
500 to 750 kV
35 ft
10.67 m
750 to 1000 kV
45 ft
13.72 m
⚡ ELECTROCUTION HAZARD: Allow additional clearance for platform movement, electrical line sway or sag, and wind gusts. NEVER operate during lightning or electrical storms. Do NOT use the machine as a welding ground.
Tip-Over Hazard Prevention
NEVER raise or extend the boom unless the machine is on firm, level ground
NEVER exceed rated platform capacity for the current operating zone (restricted or unrestricted)
NEVER drive with the boom raised on uneven terrain, near drop-offs, or soft/unstable surfaces
NEVER replace foam-filled tires with air-filled tires — wheel weight is critical to machine stability
NEVER attach fixed or overhanging loads to any part of the machine
NEVER use the boom as a crane or for pushing/pulling objects
Do not increase platform surface area (such as with large panels) without engineering authorization
🔍 Section 3: Pre-Operation Inspection
A thorough pre-operation inspection MUST be performed at the start of every shift and whenever operators change. This inspection is a legal and safety requirement — not optional. If any item fails, tag the machine OUT OF SERVICE and report it to your supervisor immediately. Do not operate until repairs are completed and documented.
Inspect the Operator's Manual
Verify the Operator's Manual is present in the manual storage container on the machine platform. It is a required part of the equipment and must remain with the machine at all times.
Walk-Around Inspection Checklist
✓
Fluid Levels: Check engine oil, hydraulic fluid, coolant, and fuel. No leaks visible on ground beneath machine.
✓
Tires: Foam-filled tires are structurally sound, no cuts, gouges, or missing chunks. All lug nuts present and tight.
✓
Structural Components: Boom sections, turntable, chassis — no cracks, bends, weld damage, or missing fasteners.
✓
Hydraulic Hoses & Fittings: No kinks, fraying, chafing, or active leaks. All fittings secure.
✓
Platform & Guardrails: Platform floor clean and dry. All guardrails secure, swing gate latches properly. Mid-rail functional.
✓
Lanyard Anchor Points: Both anchor points inside platform are secure and undamaged. Verify before every use.
✓
Safety Decals: All safety decals present and legible. Replace immediately if damaged or missing.
✓
Battery (if applicable): Battery terminals clean, no corrosion. Fluid level within range (wear PPE when checking).
✓
Emergency Stop Buttons: Both platform and ground E-stop buttons pull out freely (ON position) before starting.
Function Tests (Before First Use Each Shift)
✓
Engine Start & Idle: Engine starts normally, idles smoothly, no unusual sounds or exhaust smoke. Check all indicator lights.
All Platform Controls: Test boom up/down, extend/retract, jib up/down, platform level, platform rotate, turntable rotate, drive forward/reverse, steer left/right.
✓
Platform E-Stop: With boom slightly raised, press platform E-stop — all functions must cease immediately. Pull out to resume.
✓
Ground Controls: Verify ground control station functions work correctly from ground level.
✓
Auxiliary Power: Verify auxiliary power function is accessible (for emergency descent).
💡 Inspection Documentation: Record your pre-operation inspection results on the company's daily equipment inspection log. If no defects are found, note "inspected — no defects." If defects are found, document them specifically and attach the Out-of-Service tag to the controls.
🕹️ Section 4: Controls & Components
Machine Components — Key Parts Identification
🔩 Chassis
Lower frame with 4WD drive system, foam-filled tires, and counterweight. Base of stability.
🔄 Turntable
Rotates 360° continuously. Mounts the boom to the chassis. Contains the hydraulic manifold and engine.
📐 Main Boom
Telescoping boom arm. Raises, lowers, extends, and retracts via proportional controls.
📏 Jib Boom
Secondary articulating arm at boom tip. Provides additional reach and angle positioning. Raises/lowers independently.
🏠 Platform
Work area at jib boom tip. Includes swing gate, mid-rail, two lanyard anchors, and full control panel.
📊 Ground Controls
Control station on machine chassis. For machine storage, function tests, and emergency rescue only.
Ground Control Panel
The ground control station is accessed from the chassis level. It is used for three specific purposes ONLY:
Raising/lowering the platform for storage — before and after transport
Function tests — at start of shift before climbing into platform
Emergency rescue — to retrieve an incapacitated operator from the platform
When the key switch is set to the ground position, the platform controls are completely disabled including the platform E-stop.
Key Ground Control Components:
Key Switch (Off / Ground / Platform): Selects operating mode. Remove key when not in use.
Red Emergency Stop Button: Push IN to stop all functions and engine. Pull OUT to enable operation.
Function Enable Button: Must be held to activate any ground control function (dead-man protection).
Boom Up / Boom Down Buttons: Raise and lower the main boom.
Boom Extend / Boom Retract Buttons: Extend and retract the telescoping boom section.
Auxiliary Power Button: Hold to activate for emergency descent if primary power fails.
Jib Boom Up / Jib Boom Down: Raise and lower jib (secondary arm).
Turntable Rotate Left / Right: Rotate the entire upper structure.
Platform Rotate Left / Right: Rotate the work platform (up to 160°).
Platform Level Up / Down: Maintain platform level as boom angle changes.
Recovery Switch: For use by trained and authorized personnel only — emergency override.
Platform Control Panel
The platform controls are the primary operating interface. All boom movement functions are available here. Key controls include:
🚨 Emergency Stop
Red mushroom-head button. Push IN: all functions stop and engine shuts off. Pull OUT: clears E-stop for normal operation.
📢 Horn Button
Sounds audible warning horn. Use before every movement — especially before driving.
🕹️ Drive & Steer
Dual-axis proportional handle. Forward/reverse drive AND left/right steer. Speed is proportional to handle deflection.
⚡ Drive Speed Select
Turtle = low range for slopes/inclines. Rabbit = high range for maximum travel speed on level ground.
↕️ Boom Up / Down Switch
Raises and lowers the main boom. Proportional control — partial deflection = slower movement.
↔️ Boom Extend / Retract
Extends or retracts the telescoping boom section. Envelope control will auto-retract at limits.
📐 Jib Boom Switch
Up/down switch for the secondary articulating jib arm at the boom tip.
🔄 Turntable Rotate
Rotates the entire upper structure 360°. Use color-coded direction arrows for reference.
📊 Indicator Lights
Fault, overload, restricted ROM (weight & slope), machine on incline, drive enable, generator, and glow plug indicators.
💡 Drive Enable Feature: When the boom is rotated past the non-steer wheels, the drive enable indicator light will flash and drive will be interrupted. To resume, hold the drive enable switch to either side and slowly move the drive handle. Be aware the machine may move in the opposite direction relative to controls — always look in the direction of travel and observe surrounding color-coded direction arrows.
⚙️ Section 5: Operating Instructions
Starting the Machine
✓
Complete the full pre-operation inspection before boarding
✓
Don and properly adjust full-body harness before entering platform
✓
Enter the platform with the machine stowed and at ground level — close the swing gate
✓
Connect lanyard to designated anchor point inside the platform
✓
Turn key switch to PLATFORM position
✓
Verify platform E-stop is pulled OUT (green/on). Verify ground E-stop is pulled OUT.
Clearances: Confirm safe distance from all power lines per the voltage clearance table
Elevating & Positioning
Confirm machine is on firm, level ground before elevating
Raise boom slowly — watch for overhead obstructions at all points during elevation
Use jib boom to fine-tune positioning at working height
When extending the boom, the automatic envelope control will retract the boom if you reach the operational boundary — this is normal and is a safety feature
If the restricted ROM indicator illuminates (weight or slope), reduce boom movement to within the restricted zone. Do not attempt to override.
Never lean over the guardrails. Do not climb on guardrails, toeboards, or use ladders in the platform.
Never place loads outside the platform perimeter or attach overhanging loads
Maximum manual force on adjacent structures: 90 lb / 400 N
Driving the Machine
Always sound the horn before moving — this is mandatory, not optional
Observe and follow the color-coded direction arrows on the platform controls and chassis
Use Turtle (low speed) when on slopes, uneven terrain, or near other personnel
With the boom elevated, drive speed is automatically reduced. Drive only on firm, level ground when elevated.
Be aware of the boom position and turntable tailswing when rotating — both can swing and strike nearby objects
Limit speed based on surface conditions, slope, visibility, congestion, and worker proximity
Do NOT drive with the boom raised over uneven terrain, near drop-offs, holes, or unstable surfaces
No stunt driving or horseplay of any kind
Lockout Procedure — After Each Use
Follow these steps every time you finish operating:
Select a safe parking location — firm level surface, clear of traffic and obstructions
Retract and lower the boom completely to the stowed (transport) position
Rotate the turntable so the boom is positioned between the non-steer wheels (transport position)
Turn the key switch to the OFF position and remove the key to prevent unauthorized use
Record machine hours and any observations in the equipment log
Driving on Slopes
Slope ratings apply to the machine in the stowed position ONLY with one person in the platform and adequate traction. Additional platform weight may reduce effective slope rating.
Direction
Maximum Grade (4WD, Stowed)
Platform Downhill (forward)
45% (24°)
Platform Uphill (reverse)
45% (24°)
Side Slope
25% (14°)
⚠️ NEVER drive on slopes with the boom raised or extended. The tilt sensor will restrict operation automatically, but always use good judgment and select low-speed (turtle) mode on any incline.
🚨 Section 6: Emergency Procedures & Tilt Recovery
Tilt Alarm Activation
The tilt alarm sounds in the platform when the machine is on a severe slope. When the tilt alarm activates with the boom elevated, the machine-on-incline indicator light will illuminate and drive function in one or both directions will be disabled. Do NOT attempt to override this condition. Follow the tilt recovery procedure below.
⚠️ TILT ALARM RECOVERY — CRITICAL PROCEDURE:
If tilt alarm activates with platform DOWNHILL (boom pointing away from slope):
1
RETRACT the boom first
2
LOWER the boom second
If tilt alarm activates with platform UPHILL (boom pointing up the slope):
1
LOWER the boom first
2
RETRACT the boom second
Do NOT rotate the turntable while performing tilt recovery. The sequence is different for each orientation — memorize both.
Power Loss While Elevated
If the machine loses power while the platform is elevated:
STAY ON THE PLATFORM — NEVER attempt to climb down the boom or structure
Signal ground personnel for assistance
Ground personnel: use the auxiliary power button (ground control panel) to activate emergency descent
Hold auxiliary power button and activate boom down/retract functions to lower platform
After safe recovery, tag machine OUT OF SERVICE and contact maintenance
Platform Caught or Snagged
If the platform becomes caught on, snagged by, or prevented from moving by an adjacent structure:
IMMEDIATELY press the E-stop button
ALL personnel must exit the platform before any attempt to free it
Use ground controls ONLY to attempt to free the platform after all occupants are clear
Never attempt to free a snagged platform using platform controls with people in it
Fire / Explosion Hazard
Do NOT start the engine if you smell diesel fuel, LPG, or other flammable substances
Do NOT refuel with the engine running
Refuel only in open, well-ventilated areas — away from sparks, flames, and lighted tobacco
Do NOT charge the battery in hazardous locations
If using the optional welder: a fire extinguisher must be immediately accessible per OSHA 1926.352(d)
Batteries emit explosive hydrogen gas — keep sparks and open flame away from battery compartment
Electrical Contact
⚡ IF THE MACHINE CONTACTS AN ENERGIZED POWER LINE:
If platform operator can safely exit to the ground — do so in ONE continuous jump (do not step off and remain in contact with the machine and ground simultaneously)
Ground personnel: DO NOT touch or attempt to move the machine
Call emergency services and utility company immediately
Keep all bystanders at least 50 ft (15 m) away
Do not re-approach the machine until the power company has confirmed the line is de-energized
Environmental Conditions
Wind: Maximum operating wind speed is 28 mph (12.5 m/s). If wind speeds are forecast to exceed this, do not begin work. If they exceed it during operation, lower the boom immediately and cease operations.
Lightning: Do NOT operate during lightning or electrical storms. Lower and stow the boom if weather approaches.
Indoor use: This machine uses a diesel engine. Ensure adequate ventilation for exhaust gas removal in enclosed spaces. Consider carbon monoxide monitoring.
Visibility: Do not operate in conditions of reduced visibility where hazards cannot be clearly identified.
📝 Ready for the Final Assessment?
Review all six training sections before beginning. You need 80% or higher to pass. You will have one attempt — read each question carefully before answering.